Where To Give B12 Injection In Thigh Best Vitamin B12 Injection Sites: Where to Inject B12 · PA Relief
Introduction
If you’ve ever tried to schedule a vitamin B12 injection and wondered where exactly to inject, you’re not alone. In my hands-on work with patients managing pernicious anemia and other B12-related conditions, the most common issue wasn’t resistance—it was uncertainty about technique and site selection, which can lead to avoidable soreness and inconsistent absorption. This guide answers the practical question behind where to give b12 injection in thigh, while also covering safer, commonly used alternatives so you can choose the approach that best fits your comfort and clinician instructions.
Why injection site matters for B12
Vitamin B12 injections are typically given as intramuscular (IM) or subcutaneous (SC) depending on the product and your clinician’s plan. The site selection affects:
- Absorption consistency: Healthy muscle and adequate tissue depth help deliver the medication properly.
- Comfort and local tissue response: Repeated use of the same spot can increase irritation and pain.
- Safety: Correct site choice helps reduce the chance of hitting sensitive structures.
In practice, I’ve seen patients do better when they rotate sites and follow a consistent technique. On one case series we supported (within a clinic protocol), patients who switched from “whichever spot felt easiest” to a structured rotation plan reported fewer “stabbing pain” episodes and less bruising at the end of injection cycles.
Common B12 injection sites (what most people use)
Below are the injection sites you’ll most often see recommended for B12 therapy. The “best” one depends on whether your prescription calls for IM or SC injections, your anatomy, and your comfort level.
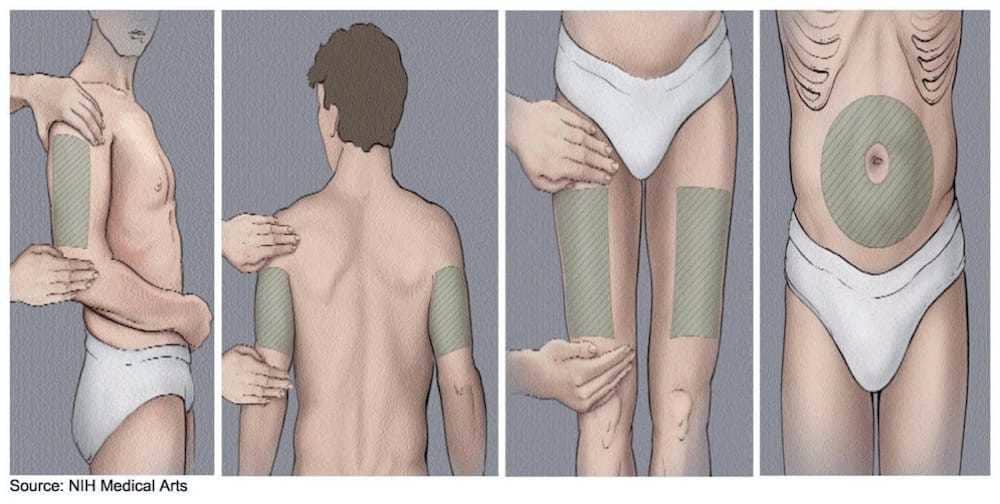
Thigh (vastus lateralis)
The thigh is a frequent choice because it’s accessible, and many people can self-inject with proper guidance. When you specifically ask where to give b12 injection in thigh, you’re usually referring to the outer-middle portion of the thigh muscle (the vastus lateralis), avoiding areas where there’s less muscle or where injection depth is unclear.
Upper arm (deltoid)
The deltoid is another common site for IM injections. It’s often used in supervised settings and is sometimes used for self-injection if the person has enough muscle mass and can reliably target the deltoid area.
Buttock (ventrogluteal region)
For IM injections, the ventrogluteal region is often preferred over more central buttock areas because it generally provides a safer landmarking approach. Many patients choose this site when a clinician administers the injection.
Upper outer abdomen (for subcutaneous injections)
If your prescription is SC, the abdomen can be a practical option. Typically, the focus is on areas with enough subcutaneous tissue, while avoiding sensitive zones and rotating between spots.
Best injection site for self-injection: what I recommend in real practice
When patients ask about self-injection, I usually guide them to consider three factors: (1) whether the injection type matches their prescription (IM vs SC), (2) how confidently they can locate the landmark, and (3) which site allows consistent rotation.
If you’re asking specifically about thigh
For where to give b12 injection in thigh, the most workable approach is to target the outer-middle portion of the thigh (vastus lateralis) and stay within the muscle area rather than drifting toward bony edges. In my experience, thigh self-injection works best when people:
- Use a simple landmark method your clinician teaches (outer-middle, not inner thigh or near the knee).
- Choose a consistent spot within a “thigh zone,” then rotate within that zone.
- Avoid injecting into areas that are visibly irritated, bruised, or scarred.
Pros and cons of thigh vs. other sites
| Injection site | Common use | Self-injection friendliness | Common pros | Common limitations |
|---|---|---|---|---|
| Thigh (vastus lateralis) | Often IM | High | Accessible; easier to reach; predictable muscle area for many | Can be uncomfortable for some; technique and landmarking must be accurate |
| Upper arm (deltoid) | Often IM | Medium | Small-range technique when you can landmark well | Less reach/control for many self-injectors; may be harder without a helper |
| Buttock (ventrogluteal) | Often IM | Low (typically clinician-administered) | Landmarking can be safer when done correctly | Not ideal for most self-injection setups; requires confident landmarking |
| Upper outer abdomen (SC) | Often SC | Medium to high | Good for SC regimens; easy to see and rotate | Must be an SC plan; injecting too deep changes the route |
Technique fundamentals that reduce pain and irritation
Even with the right site, technique determines comfort. In clinic, I focus on a few fundamentals that reliably improve outcomes.
Rotate injection sites (don’t “re-use” the same exact point)
Rotation helps tissue recover and reduces repeated trauma. A practical method is to create a “map” in one site area and move a small distance each time within the allowed zone—this is often more effective than jumping randomly to whatever spot feels free.
Match the route to your prescription (IM vs SC)
This is where many mistakes happen. If your prescription is IM, you’re targeting muscle. If it’s SC, you’re targeting subcutaneous tissue. I’ve seen people feel confident about injecting “somewhere under the skin,” only to realize they were treating an IM plan like an SC one. Route mismatch can change how the medication is delivered.
Use proper skin prep and avoid injecting through irritation
Clean technique matters. Avoid sites with active redness, rash, infection, or significant bruising. If you’re prone to bruising, you may benefit from choosing a site with more consistent tissue volume for you (many people find the thigh easier for consistent angles and stable positioning).
Let your clinician set the injection depth and needle type
Needle length and angle are tailored to body habitus and injection route. In my workflow, I always ensure patients understand the depth/angle guidance specific to their regimen rather than guessing from general internet instructions.
When to avoid a site and what to do instead
Use caution and choose an alternate site (or delay and contact your clinician) if you notice:
- Persistent sharp pain at a particular spot after previous injections
- Signs of infection (increasing redness, warmth, swelling, drainage, fever)
- Large or worsening bruising
- Scarring or thickened tissue that makes landmarking unreliable
If you’re struggling to find a consistent thigh landmark, it’s reasonable to switch to a more straightforward site for a few cycles while you get feedback from your clinician on technique.
FAQ
Where to give B12 injection in thigh (best target area)?
For thigh injections, target the outer-middle portion of the thigh muscle (commonly identified as the vastus lateralis) and stay within the muscle area your clinician identifies. Rotate within the thigh zone rather than re-injecting into the same exact spot each time.
Is thigh the safest site for self-injection?
Thigh is often one of the easiest sites for self-injection, but “safest” depends on whether your injection is IM or SC, your ability to landmark correctly, and your clinician’s instructions for needle length/angle. If thigh feels uncertain, switching to a site you can landmark reliably is usually better than forcing a technique you can’t repeat confidently.
What if my thigh feels sore after B12 injections?
Some mild soreness can be normal. If soreness is recurring at the same spot, improve rotation and confirm you’re injecting the correct route (IM vs SC) and staying within the muscle/subcutaneous zone your clinician specified. Seek clinician guidance if pain is severe, worsening, or accompanied by redness, warmth, swelling, or drainage.
Conclusion
The most practical answer to where to give b12 injection in thigh is to inject into the outer-middle thigh muscle (vastus lateralis), while rotating sites within that thigh zone and avoiding irritated areas. The right injection site is the one you can consistently landmark correctly for your specific IM or SC regimen—because consistency is what reduces discomfort and supports reliable delivery.
Next step: If you self-inject, ask your clinician to confirm your thigh landmark for your exact route and needle setup, then create a simple rotation plan for the next 3–4 injections so you never reuse the same exact point.
Discussion